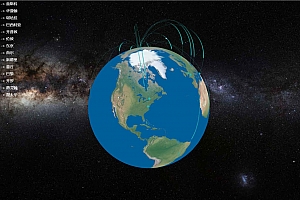
ThreeJS+WebGL实现3D蝌蚪飞线功能
利用shader粒子做出了我心心念念的蝌蚪状飞线

先说说思路,第一步是制作一个蝌蚪状的粒子束,其实很简单就是让粒子一个一个从小到大排列就好,这部分主要利用shader处理,代码如下:
const vs:string = `
attribute float size; // 顶点尺寸
attribute vec4 colors; //顶点颜色
varying float opacity; // 控制透明度
varying vec3 vexColor; // 顶点颜色
void main(){
vexColor.x = colors.r;
vexColor.y = colors.g;
vexColor.z = colors.b;
//w分量为透明度
opacity = colors.w;
vec4 mvPosition = modelViewMatrix * vec4(position,1.0); //?这里模型矩阵,坐标向量,和投影矩阵都是three给你注入的好像。
gl_PointSize = size;
gl_Position = projectionMatrix * mvPosition;
}
`;
然后就是配置数据源,数据源可以利用three.js 给的curve3组件中的getPoints取得,代码如下
this.spline = new THREE.CatmullRomCurve3(vecs);
this.pointNum = num;
this.distance = this.spline.getLength();
//初始化粒子
this.points = this.spline.getPoints(num);
const colorsLen = this.points.length * 4;
const sizeLen = this.points.length;
const colors:Float32Array = new Float32Array(colorsLen);
const sizes:Float32Array = new Float32Array(sizeLen);
this.geometry = new THREE.BufferGeometry().setFromPoints(this.points);
for(let i=0,z=0;i<colorsLen;i+=4,z++){
//color
colors[i] = color.r;
colors[i+1] = color.g;
colors[i+2] = color.b;
// opacity
colors[i+3] = (i+3)/sizeLen;
// size从小到大
sizes[z] =size*(z/sizeLen);
};
this.geometry.addAttribute(‘colors’,new THREE.BufferAttribute(colors,4));
this.geometry.addAttribute(‘size’,new THREE.BufferAttribute(sizes,1));
第二部分就是如何让粒子运动起来,这里我借助了tween.js,整体思路就是取一段固定的粒子数目+加上Curve3的getPointAt取点函数,不断的取出固定数目并不断前移的坐标,直接修改bufferGeometry的position数据即可。
下面贴出完整代码:
import * as THREE from “three”;
import TWEEN from “@tweenjs/tween.js”;
const fs:string = `
uniform sampler2D texture;
varying float opacity;
varying vec3 vexColor;
void main(){
gl_FragColor = vec4(vexColor,opacity);
gl_FragColor = gl_FragColor * texture2D(texture,gl_PointCoord);
}
`;
const vs:string = `
attribute float size;
attribute vec4 colors;
varying float opacity;
varying vec3 vexColor;
void main(){
vexColor.x = colors.r;
vexColor.y = colors.g;
vexColor.z = colors.b;
//w分量为透明度
opacity = colors.w;
vec4 mvPosition = modelViewMatrix * vec4(position,1.0);
gl_PointSize = size;
gl_Position = projectionMatrix * mvPosition;
}
`;
/**
* 粒子飞线
*/
export default class PointsFlyLine{
//粒子位置
geometry: THREE.BufferGeometry;
//曲线
spline: THREE.CatmullRomCurve3;
//粒子系统
particleSystem: THREE.Points;
//粒子数目
pointNum:number;
//粒子间的总距离
distance: number;
points: THREE.Vector3[];
tween: any;
/**
* 创建粒子系统
* @param points 粒子
* @param size 粒子大小
* @param num 粒子数目
* @param color 粒子颜色
*/
constructor({ vecs, num, size, color }: { vecs: THREE.Vector3[]; num: number; size: number; color: THREE.Color; }){
this.spline = new THREE.CatmullRomCurve3(vecs);
this.pointNum = num;
this.distance = this.spline.getLength();
//初始化粒子
this.points = this.spline.getPoints(num);
const colorsLen = this.points.length * 4;
const sizeLen = this.points.length;
const colors:Float32Array = new Float32Array(colorsLen);
const sizes:Float32Array = new Float32Array(sizeLen);
this.geometry = new THREE.BufferGeometry().setFromPoints(this.points);
for(let i=0,z=0;i<colorsLen;i+=4,z++){
//color
colors[i] = color.r;
colors[i+1] = color.g;
colors[i+2] = color.b;
// opacity
colors[i+3] = (i+3)/sizeLen;
// size从小到大
sizes[z] =size*(z/sizeLen);
};
this.geometry.addAttribute(‘colors’,new THREE.BufferAttribute(colors,4));
this.geometry.addAttribute(‘size’,new THREE.BufferAttribute(sizes,1));
const uniforms:object = {
texture: {
value: new THREE.CanvasTexture(this.createSpriteCanvas(size)),
}
};
const shaderMaterial:THREE.ShaderMaterial = new THREE.ShaderMaterial({
uniforms,
vertexShader:vs,
fragmentShader:fs,
transparent:true,
depthTest:false
});
this.particleSystem = new THREE.Points(this.geometry,shaderMaterial);
}
//飞线开始
start(){
const max = this.distance*10;
const end:number = this.pointNum;
const m = {start:0,end};
this.tween = this.tweenAnimate(m,{start:max-end,end:max},2000,null,()=>{
let pointArr:number[] = [];
let s = Math.round(m.start),e = Math.floor(m.end);
for (let i = s; i <= e && i<=max; i++) {
pointArr = pointArr.concat(this.spline.getPointAt(i/max).toArray());
}
this.geometry.attributes.position = new THREE.BufferAttribute(new Float32Array(pointArr),3);
});
this.tween.repeat(Infinity).start();
}
stop(){
this.tween.stop();
}
tweenAnimate(current:object, target:object, interval:number, animation?:TWEEN.Easing, onUpdate?:Function, complete?:Function) {
var animate = animation ? animation : TWEEN.Easing.Linear.None;
let tween = new TWEEN.Tween(current).to(target, interval).easing(animate);
onUpdate && tween.onUpdate(() => onUpdate());
complete && tween.onComplete(() => complete());
return tween;
}
//创建圆形精灵贴图
createSpriteCanvas(size:number){
const canvas = document.createElement(‘canvas’);
canvas.width = canvas.height = size;
const context = canvas.getContext(‘2d’);
if(context!=null){
context.fillStyle=’rgba(255,255,255,.0)’;
context.beginPath();
context.arc(size/2,size/2,size/2,0,Math.PI*2);
context.fillStyle = ‘white’;
context.fill();
context.closePath();
}
return canvas;
}
}
————————————————
版权声明:本文为CSDN博主「lyh1995a」的原创文章,遵循CC 4.0 BY-SA版权协议,转载请附上原文出处链接及本声明。
原文链接:https://blog.csdn.net/qq_22939353/article/details/99691224
WEBGL学习网 » ThreeJS+WebGL实现3D蝌蚪飞线功能